Flask is a “lightweight… web app framework” in Python. It is designed to be simple but extensible; making it easy to learn, while simultaneously allowing experienced web developers the freedom to integrate the tools they prefer.
![]()
Installation
Flask can be installed using pip:
pip install Flask
The Flask installation guide has more details on how to:
- work in a virtual environment
- install the latest unreleased version
- include optional dependencies to enhance functionality.
Getting Started
The Flask Quickstart guide wonderfully introduces its main features:
- Routing & URL building
- Including static assets
- Rendering HTML templates
- Handling HTTP requests
and much more.
There’s also a Flask tutorial, which walks you through how to build a basic blog that allows user registration, log in, and the creation / modification / deletion of posts.
If you’re completely new to web development, there are numerous online resources (e.g. MDN’s Learn Web Development, W3Schools, etc) that could quickly bring you up to speed.
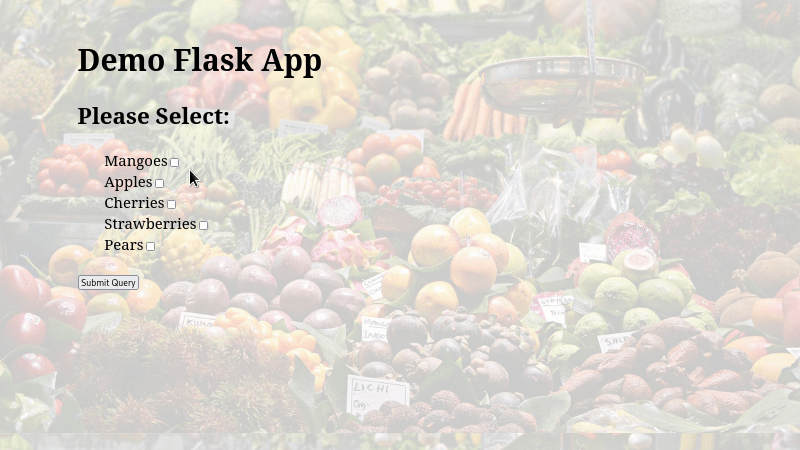
Building a demo Flask app
To keep things simple, let’s create a minimal Flask app that just takes user input and displays it:
We’ll need to install Flask in a virtual environment, and then create the following files:
myproject
├── app.py
├── static
│   ├── fruits.jpg
│   └── style.css
└── templates
    └── fruits.html
The code for the complete app is available here.
1. app.py
Defines:
- A home page, which contains a form to select fruits.
- A checkout page that displays data submitted in the home page.
from flask import Flask, render_template, request, redirect, url_for

app = Flask(__name__)
fruits = ["Mangoes", "Apples", "Cherries", "Strawberries", "Pears"]


@app.route("/")
def home() -> str:
    """Creates the home page, with a form to capture user input.

    Returns:
        str: Rendered HTML.
    """
    return render_template(
        "fruits.html", title="ACME Fruit Store", fruit_list=fruits
    )


@app.route("/checkout", methods=["GET", "POST"])
def checkout() -> str:
    """Creates the checkout page that displays user input.

    Returns:
        str: Rendered HTML.
    """
    if request.method == "POST":
        basket = request.form.getlist("fruit") or ["No fruits selected."]

        return render_template("fruits.html", selection=basket)

    return redirect(url_for("home"))


if __name__ == "__main__":
    app.run(debug=True)
2. static/fruits.jpg
The background image, available here (The original photograph, by @ja ma, can be found here).
NOTE: In order for Flask to serve CSS, JavaScript, or image files stored locally; they’ll need to be placed in a static folder.
3. static/style.css
Sets the basic style and layout.
body {
    background: center / cover url("/static/fruits.jpg");
    font-size: 1.4em;
    margin: 5% auto;
    width: 80%;
}
4. templates/fruits.html
Defines the app’s structure.
<!DOCTYPE html>
<html>
<head>
  <link rel="stylesheet" type="text/css" href="{{ url_for('static', filename='style.css')}}">
  <meta name="viewport" content="width=device-width, initial-scale=1">
  <title>{{ title }}</title>
</head>
<body>
  {%if fruit_list %}
  <h1> Demo Flask App</h1>
  <h2>Please Select:</h2>
  <form action="{{ url_for('checkout')}}" method="POST">
    <ul>
      {%for fruit in fruit_list %}
      {{ fruit }}<input type="checkbox" value="{{ fruit }}" name="fruit"><br>
      {%endfor %}
    </ul>
    <input type="submit">
  </form>
  {%endif %}

  {%if selection %}
  <h2>Selected fruits:</h2>
  <ul>
    {%for item in selection %}
    <li>{{ item }}</li>
    {%endfor %}
  </ul>

  <a href="{{ url_for('home') }}"> Back to home</a>
  {%endif %}
</body>
</html>
NOTE: Templates to be rendered need to be placed in the templates folder.
Running the demo app
Once all the necessary files are in position, you can launch the app in the command line interface, e.g with Bash:
export FLASK_ENV=development  # to enable debug mode
flask run
Afterwards, navigate your browser to http://127.0.0.1:5000 to interact with the app.
Next Steps
Flask offers a number of deployment options. You could try coming up with a great idea for a web app, build it, and then deploy it.